You know the story well. Your operator comes in your office to tell you there’s a problem with a piece of equipment. This time he tells you there is an error code on one of the chain hoists. You may feel some mixed emotions in the moment, but you’re just trying to figure out your first steps to resolving the problem. Use this guide to start the troubleshooting process for error codes displayed on your Demag DC Chain Hoist so you can quickly diagnose your next steps and get things moving again.
The Demag DC chain hoist has a 7-segment LED interface that is a great communication tool for operators and maintenance technicians. It can help you quickly diagnose issues, determine whether you need to call in a trained technician, or quickly determine if there is no issue. We will go through the what codes mean and what you need to do next to get back up and running.
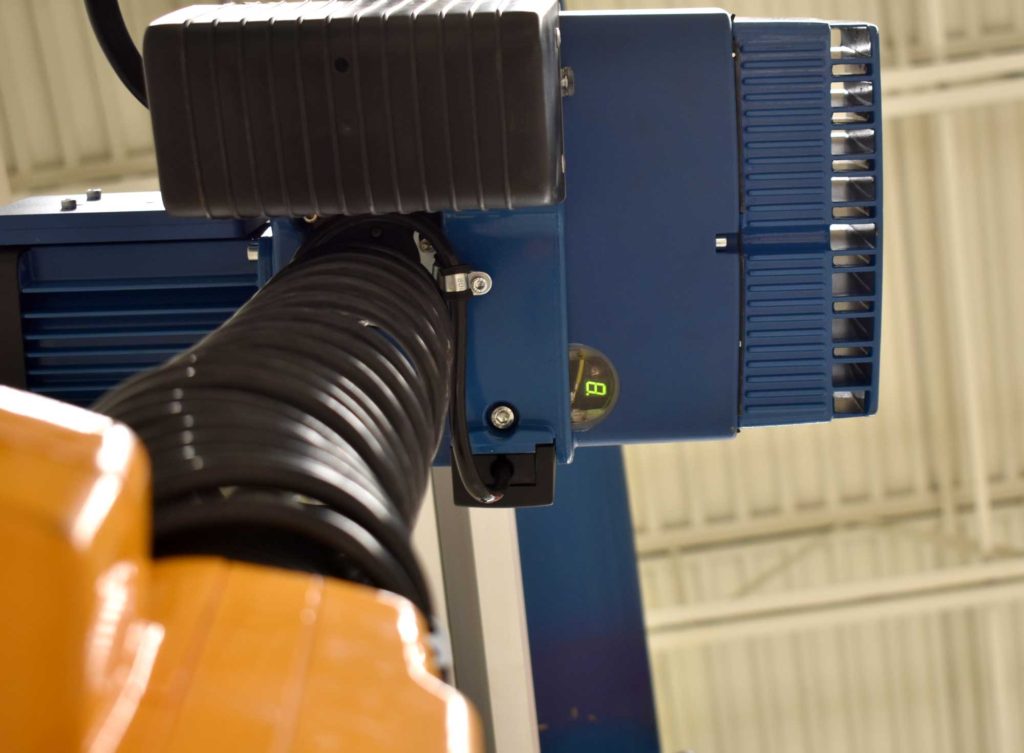
Demag DC-Pro Chain Hoists have a 7-segment LED interface on the bottom of the hoist body. Here codes will display during normal operation and when there is an error.
Active error codes on Demag DC-Pro Chain Hoists are displayed on the 7-segment LED interface on the bottom of the hoist body. It’s easy to see and the code will give you a starting point of things to check to fix the issue. Active error codes on Demag DC-Com Chain Hoist are displayed under the electrical panel cover. Simply remove the cover to view the LED display.
Error Code E or Fault Symbol
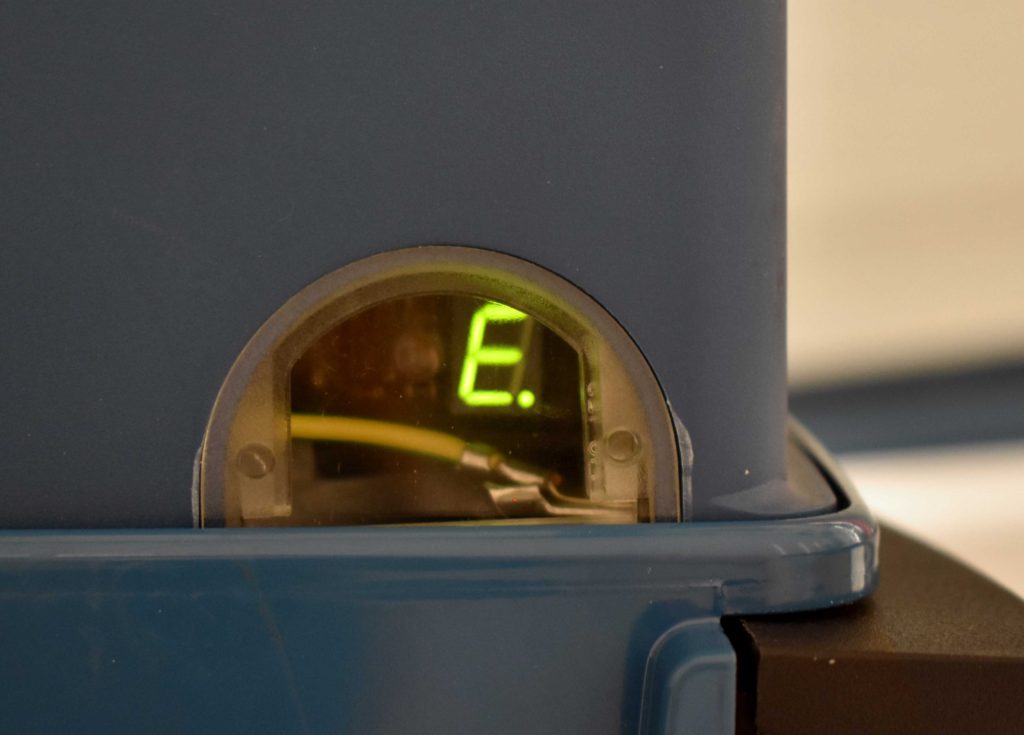
In general, error codes are displayed starting with an ‘E’ or a fault symbol, a zigzag that resembles a lightning bolt, followed by a number. Once seen, you can easily check your operating instruction manual to find a list of steps to troubleshoot the issue. If there is no code displayed while power is being supplied to the hoist, but you are still having issues with the hoist unit, this indicates that there is a bad control board. Look and smell for signs of overheating or burnout in the control panel and board itself. If an error code is displayed, it will be one of the errors pictured below. Consult your Operator’s Manual for specific troubleshooting by Error or Fault code.


If you have performed the recommended steps from your Operator’s Manual for the error code and you are still experiencing the same problem, chances are you will need to change out the control board. It’s always recommended to have a spare board on hand.
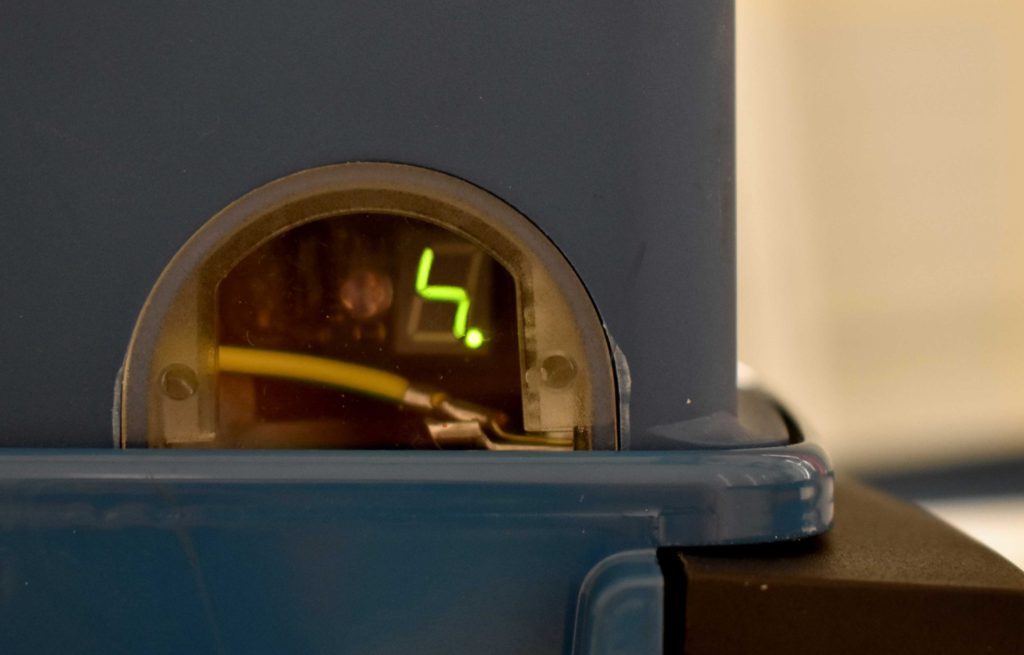
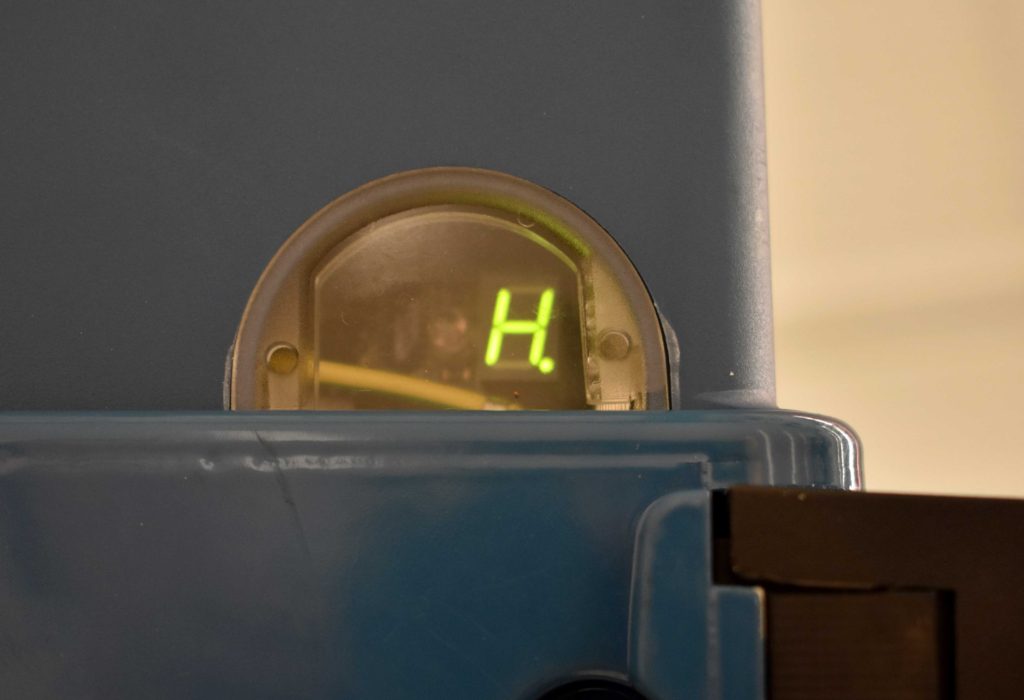
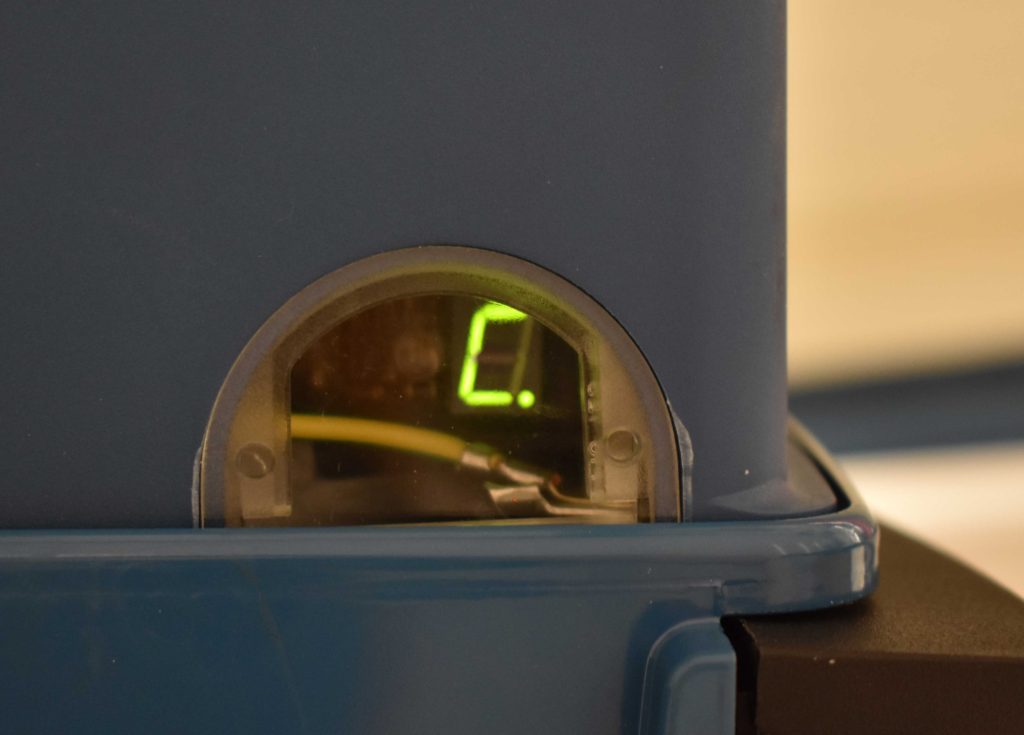
Code U, H, or C
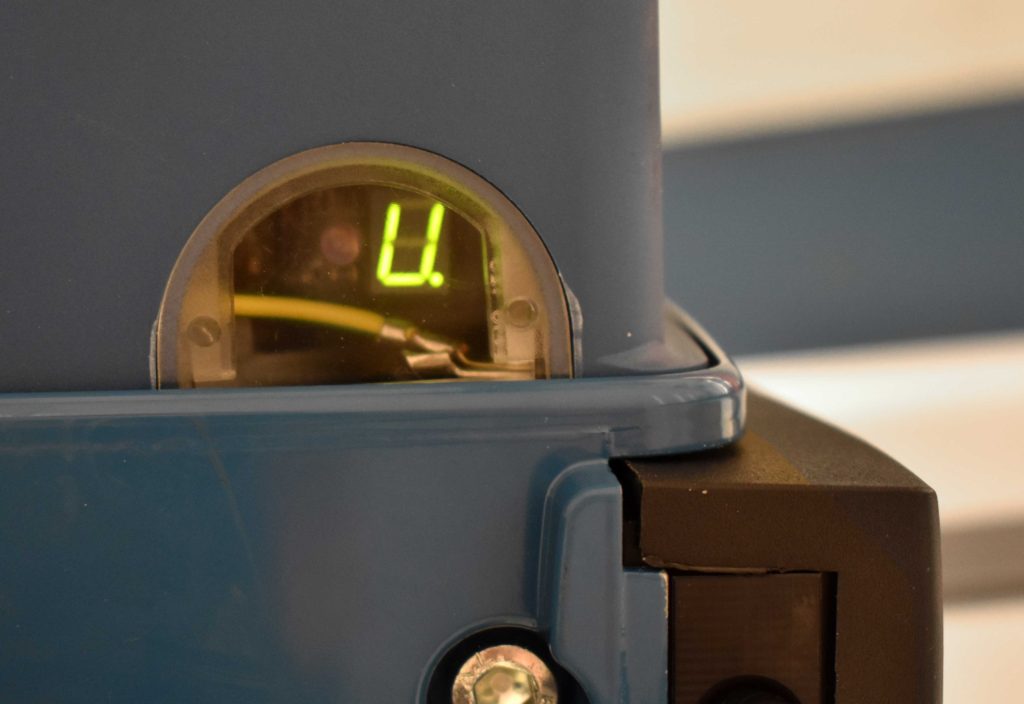
The LED display also shows codes that are not error or fault codes. The purpose of these codes is to indicate preventive maintenance that should be performed. These codes are letters- U, H, or C. The ‘U’ is really a ‘V’, which stands for the software version running in the hoist control board. You will see a ‘U’ displayed every time the power is switched on, or immediately after the e-stop button is activated, followed by a number identifying the version of the software. This is useful information for diagnosing proper operation during the troubleshooting process.
The LED display will show an ‘H’ followed by numbers when the hoist is idle for 3 seconds or more without lifting. The ‘H’ stands for Hours and the numbers following it show the total operating hours. For example, the display may show ‘H’ followed by 5, which is 5 operating hours, or ‘H’ followed by 1, 5, and 0, which is 150 operating hours.
You will notice that after the ‘H’ series displays, a ‘C’ comes up. The hours alternate with the ‘C,’ which indicates the contactor cycles on the main control contactor K1. Since the K1 contactor is designed to see the inrush current every cycle, it is changeable and can be removed from the control board independently of the other contactors. The number appearing after the C should be multiplied by 100,000. Expected service life of the contactor varies by DC chain hoist model.
Code 8
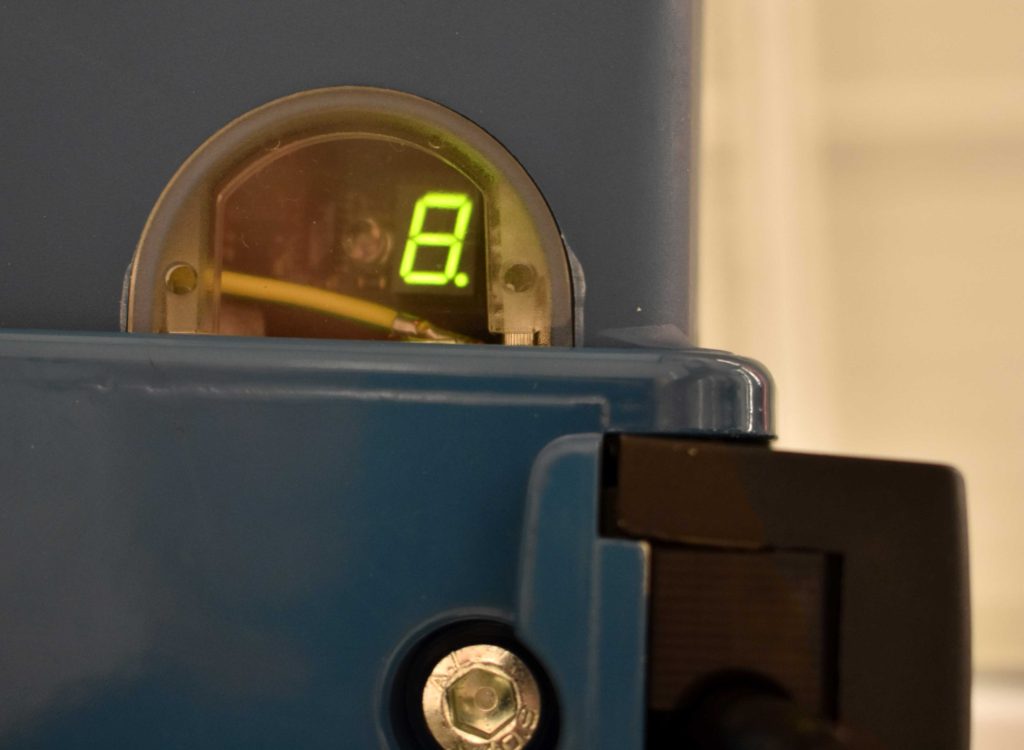
A lone ‘8’ appears when the emergency stop button has been pressed. In contrast, when the e-stop button is not activated, only the top and bottom of the ‘8’ will be indicated when lifting or lowering with the hoist. If the ‘8’ appears when the emergency stop button is not activated, it can indicate something is wrong with the DC hoist unit. You likely have a loose control cable plug, defective pushbutton in the pendant, or broken wire in the control cable.
If you have multiple Demag DC chain hoists in your facility, you can quickly test whether there is a broken wire in the control cable. Simply swap the pendant from a functioning unit to the unit showing the ‘8.’ The control cables are designed to be a quick connect so the simple twist-lock connection allows for a quick substitution. If the substitute pendant allows the hoist to function, you’ve found your problem. Demag recommends you keep a spare control cable and pendant on hand for troubleshooting by substitution.
Troubleshooting any Demag DC Chain Hoist is easy with the 7-segment LED interface located on the bottom of the hoist body or under the electrical cover. It’s easy to see the error or fault codes, then simple to cross-reference the code with the Troubleshooting Guide found in your operator’s manual. As always, a qualified technician is a great resource to help diagnose issues and maintain your equipment for a long life. The next time one of your operators comes in to tell you there’s an issue, you now have a resource to help you get to the bottom of the problem quickly and efficiently.